Greengrass

Version 1.0
Updated on 05 December 2023
This /IOTCONNECT™ Greengrass SDK package will show you how to deploy and run the custom component.
| Date | Name | Download |
|---|---|---|
| 05 December 2023 | Greengrass SDK V1.0 | Download |
Getting started
Template Management
A template is a pre-defined structure required to manage Greengrass devices and their associated properties. The structure helps you to provision your IoT system to take care of the entire device management system with the seamless data flow.
/IOTCONNECT™’s template feature will help you with the following:
- Add and manage devices.
- Define associated data captured by the device in the form of attributes.
- Set commands to allocate the actions you want the device to perform.
Create Template
- Go to Devices > Greengrass Device > Templates.
- Click Create Template.
- Complete the required fields:

(Screen: Create Template)
Create at least one attribute of your choice, which will leads to create template for your greengrass deices. The same attribute must exist in your custom component source code explain in below topics.

(Screen: Create Attribute)
Greengrass device
To create a Greengrass device for your organization:
- From the left navigation, mouseover the Devices module. Click Greengrass Device.
- Along the top and toward the right, select Create Device.
- Enter data in the following fields:

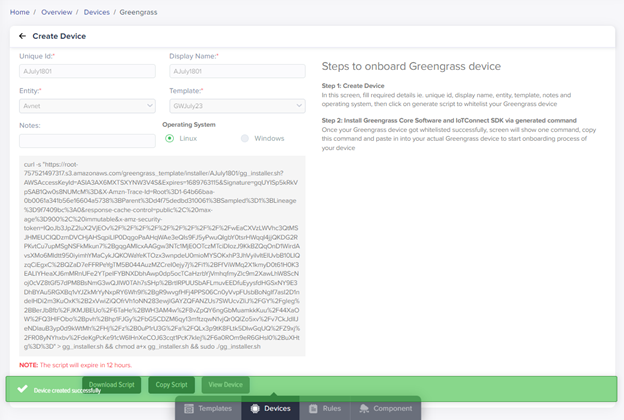
(Screen: Create Device)
- Unique ID: Enter the unique ID of a device.
- Display Name: Enter the display name for a device.
- Entity: Select the entity for your device.
- Template: Select the template for your device.
- Notes: You can add required notes for a device.
To onboard a Greengrass device, you need to follow the two main steps. The first step is to create a device by filling in the required details, such as the unique ID, display name, entity, template, notes and operating system. Once you have entered all the necessary information, click ‘Generate Script’ to whitelist your Greengrass device. This will ensure that your device is authorized to connect.
When you click Generate Script, you will see the pop-up container as shown in the following screenshot.

(Screen: Copy/Download Script)
After successfully whitelisting your Greengrass device, you can proceed to the second step. That involves installing the Greengrass Core Software and /IOTCONNECT™ SDK via the generated command. Once you copy the command, paste it into your actual Greengrass device to start onboarding. With these two simple steps, you can easily onboard your Greengrass device and use it for your IoT projects.
Required fields have a red asterisk on the upper-right side of every field name.
The Greengrass device list will reflect your device.
Greengrass SDK
After successfully whitelisting your Greengrass device, you can proceed to the second step. That involves installing the Greengrass Core Software and /IOTCONNECT™ SDK via the generated command Script. Once you copy the command, paste it into your actual Greengrass device to start onboarding. With these two simple steps, you can easily onboard your Greengrass device and use it for your IoT projects.

(Screen: Command Script at your device)
Upon the successful installation of the Greengrass Core Software on your device, you will observe that the “com.iotconnect.sdk2” is installed and operational. However, it’s important to note that this SDK doesn’t inherently generate telemetry data. Instead, it actively awaits data from client components on a specific topic designated for interprocess communication (IPC). The SDK will only engage in data exchange based on the information received from any connected client components. Additionally, we will delve into the process of onboarding a custom component to establish communication between the SDK and the said custom component.
Greengrass SDK Communication
Since you have the running SDK on your device you are able to locally communicate to SDK along with your custom component as well. This is to note that the custom component have to use the “import awsiot.greengrasscoreipc” lib at your component source code.
Greengrass 2.0 provides an inter-process communication (IPC) SDK for inter-process communication. By using IPC SDK feature, Publisher (Pub) and Subscriber (Sub) communication can be performed between each process of the custom component.
In this step, you’ll learn how to create a component that reads sensor data and keeps publishing to a topic, a component that subscribes to that topic logs and receives the messages, and a custom component that uses IPC.
Creating a component
In the upcoming segment, we will generate a simulated sensor designed to publish its data to a designated topic, allowing the SDK to receive and process the information. This involves crafting artifacts and recipes to facilitate the creation and deployment of the custom component onto your device.
Artifact
Generate the following files and compress them into an artifact named, for example, “com.example.Publisher.zip”.
dummy_sensor.py
    # Copyright Amazon.com, Inc. or its affiliates. All Rights Reserved.
    # SPDX-License-Identifier: MIT-0
    from random import gauss
    class DummySensor(object):
        def __init__(self, mean=25, variance=1):
            self.mu = mean
            self.sigma = variance
        def read_value(self):
            return float("%.2f" % (gauss(1000, 20)))
    if __name__ == '__main__':
        sensor = DummySensor()
        print(sensor.read_value())
example_publisher.py
    # Copyright Amazon.com, Inc. or its affiliates. All Rights Reserved.
    # SPDX-License-Identifier: MIT-0
    import sys
    import os
    import os.path
    import time
    import json
    import datetime
    import random

    import awsiot.greengrasscoreipc
    from awsiot.greengrasscoreipc.model import (
        PublishToTopicRequest,
        PublishMessage,
        BinaryMessage
        #JsonMessage
    )
    from dummy_sensor import DummySensor

    frequency = int(sys.argv[1])
    print(frequency)
    TIMEOUT = 30
    publish_rate = 1.0

    ipc_client = awsiot.greengrasscoreipc.connect()

    sensor = DummySensor()

    topic = "iotc/rpt/d2gg/sub"

    while True:
        data = {"Temperature":sensor.read_value()}
        message = [{
                "uniqueId": "Your-uniqueId",
                "time": datetime.datetime.utcnow().strftime("%Y-%m-%dT%H:%M:%S.000Z"),
                "data": data
        }]
        print("Publish sending message {}".format(message))
        msgstring = json.dumps(message)
        request = PublishToTopicRequest()
        request.topic = topic
        publish_message = PublishMessage()
        publish_message.binary_message = BinaryMessage()
        publish_message.binary_message.message = bytes(msgstring, "utf-8")
        request.publish_message = publish_message
        operation = ipc_client.new_publish_to_topic()
        operation.activate(request)
        try:
            future_response = operation.get_response()
            print("Future value : :  ", future_response)

            future_response.result(TIMEOUT)
        except Exception as error:
            print("Error in future()", str(error))

        time.sleep(frequency)
        pass
Recipe
Generate an empty file and insert the specified contents into the corresponding recipe file
com.example.Publisher-1.0.0.json
    {
        "RecipeFormatVersion": "2020-01-25",
        "ComponentName": "com.example.Publisher",
        "ComponentVersion": "1.0.0",
        "ComponentDescription": "A component that publishes messages.",
        "ComponentPublisher": "Iotconnect",
        "ComponentConfiguration": {
          "DefaultConfiguration": {
            "InferenceInterval": 30,
            "accessControl": {
              "aws.greengrass.ipc.pubsub": {
                "com.example.Publisher:pubsub:1": {
                  "policyDescription": "Allows access to publish to all topics.",
                  "operations": [
                    "aws.greengrass#PublishToTopic"
                  ],
                  "resources": [
                    "*"
                  ]
                }
              }
            }
          }
        },
        "Manifests": [
          {
            "Platform": {
              "os": "all"
            },
            "Artifacts": [
            {
              "Uri": "s3://Your-S3-bucket-location-path/gg-artifacts/com.example.Publisher.zip",
              "Unarchive": "ZIP"
            }
          ],
            "Lifecycle": {
              "Install": {
                "RequiresPrivilege": true,
                "script": "python3 -m pip install --user awsiotsdk"
              },
              "Run": {
                "RequiresPrivilege": true,
                "script": "python3 -u {artifacts:decompressedPath}/com.example.Publisher/example_publisher.py '{configuration:/InferenceInterval}'"
              }
            }
          }
        ]
      }
com.example.Publisher-1.0.0.yml
---
RecipeFormatVersion: '2020-01-25'
ComponentName: com.example.Publisher
ComponentVersion: 1.0.0
ComponentDescription: A component that publishes messages.
ComponentPublisher: Iotconnect
ComponentConfiguration:
DefaultConfiguration:
InferenceInterval: 30
accessControl:
aws.greengrass.ipc.pubsub:
com.example.Publisher:pubsub:1:
policyDescription: Allows access to publish to all topics.
operations:
- aws.greengrass#PublishToTopic
resources:
- "*"
Manifests:
- Platform:
os: all
Artifacts:
- Uri: s3://Your-S3-bucket-location-path/gg-artifacts/com.example.Publisher.zip
Unarchive: ZIP
Lifecycle:
Install:
RequiresPrivilege: true
script: python3 -m pip install --user awsiotsdk
Run:
RequiresPrivilege: true
script: python3 -u {artifacts:decompressedPath}/com.example.Publisher/example_publisher.py
'{configuration:/InferenceInterval}'
Component deployment
With the custom component artifact (“com.example.Publisher.zip“) and its corresponding recipe (“com.example.Publisher-1.0.0.json“) readily available, we are fully prepared to initiate the deployment of the initial custom component.
Navigate to the “Firmware -> Component” section, locate the artifact file, and click on the copy button to obtain the S3 bucket path of the artifact. Subsequently, paste this path into the “Uri” section of the recipe file.

(Screen: Create Component)
"Uri": "s3://Your-S3-bucket-location-path/gg-artifacts/com.example.Publisher.zip"
(Screen: Create Component)
Upon successful addition of the component, you will find the entry of the component in the list below. Now, to deploy the first custom component, follow two remaining steps: firstly, navigate to “Firmware -> Create Firmware,” and secondly, create a deployment.
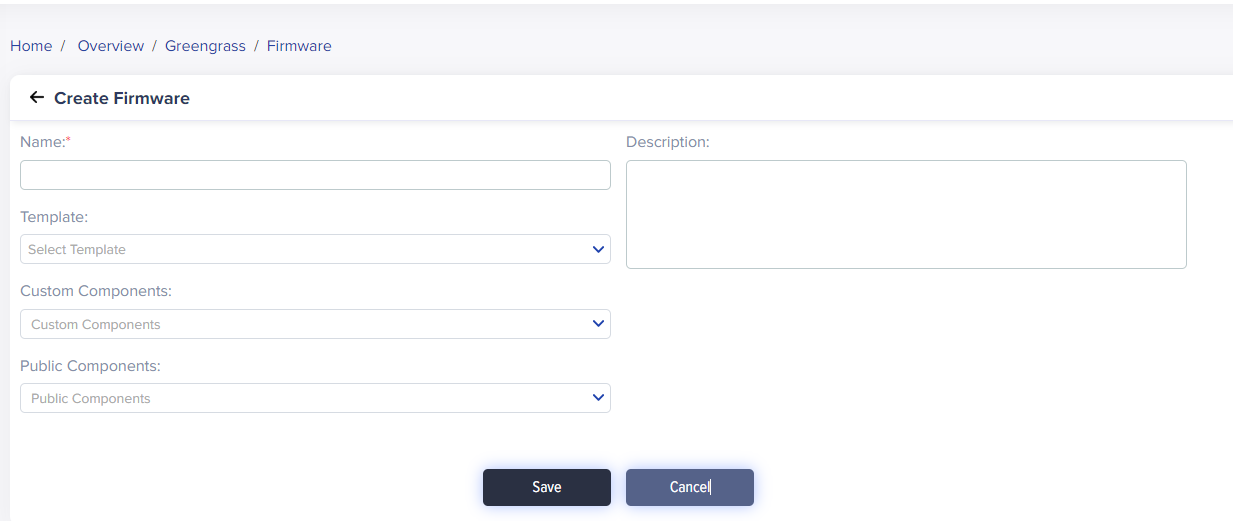
File the necessary fields.
- Name: Name of the firmware of your choice
- Template: Select the corresponding Template attached with your device
- Custom component: Select the custom component added
- Public component: Select the public component if needed.
- Save: Save the changes

(Screen: Create Firmware)
With the firmware ready, we are fully prepared to deploy the custom component attached to its corresponding component.
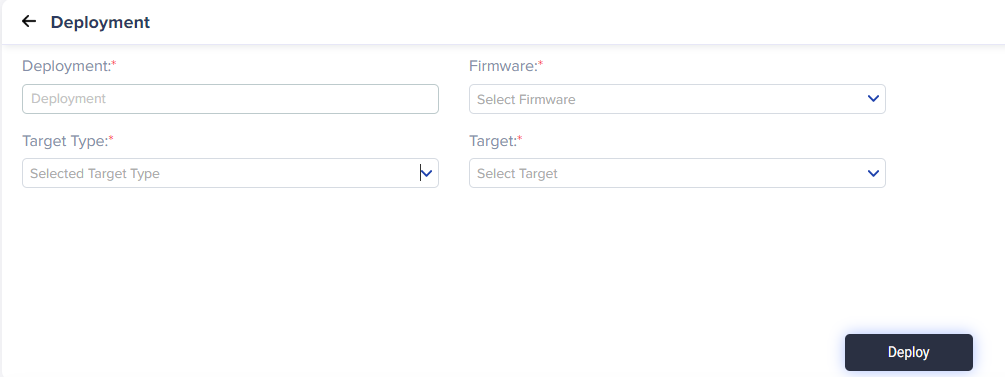
Navigate to Firmware->Deployment
File the necessary fields.
- Deployment: Name the deployment
- Firmware: Select the firmware
- Target Type: Select the target type
- Target: Select the target device
- Deploy: click to deploy

(Screen: Create deployment)
Once the custom or public component is deployed to your device, you can easily find the deployment status in the list, indicating whether it is “pending,” “successful” or “failed”
As the deployment status is success we will be able to see the telemetry data coming to live data section of device landing page.
