
Greengrass Device
AWS IoT Greengrass is an open-source Internet of Things (IoT) edge runtime and cloud service that helps you build, deploy, and manage IoT applications on your devices. With Greengrass, your devices can act locally on the data they generate, run predictions using machine learning models, and filter or aggregate device data.
The Greengrass Nucleus Lite is a device runtime for constrained edge devices optimized for a minimal memory footprint.
/IOTCONNECT supports onboarding of both Nucleus Classic and Nucleus Lite devices with simple steps.
Greengrass Device On-boarding
/IOTCONNECT interface provides easy way to onboard Greengrass device, for now platform only Linux support. Before you start you should have your device template created in platform, device templates is blueprint of data which device will sends. Once you have template created, you can now go to Greengrass Device menu and click on create device. This will ask basic information of your device.
You will see two option in Device Type dropdown
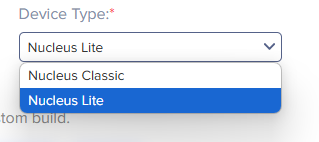
You can select Nucleus Classic to create Greengrass and to create Greengrass lite device, you need to select Nucleus Lite.
Greengrass lite Device:
Prerequisites
Before starting:
- Ensure you have an /IOTCONNECT Device Template created. A template is the blueprint for data your device will send.
- Ensure you have access to the device (Linux-based OS for Lite).
- For STM32 boards, follow the board-specific flashing/upgrade instructions below.
Onboarding a Greengrass Device in /IOTCONNECT
- Go to Greengrass Device Menu → Create Device.
- Provide basic device information.
In the Device Type dropdown, select one of:
- Nucleus Classic → for devices supporting Java, Python 3.9+, and Python venv.
- Nucleus Lite → for constrained Linux-based devices.
Nucleus Lite Setup
- Download the device credential package bundle from the device info or device listing page.
- Example: my-device-bundle.zip
- Securely store the credentials.
- Copy the bundle to the device (e.g., using scp).
- Follow the OS/Board-specific setup instructions below.
- Ubuntu 24.xx (Raspberry Pi 4/5, ARM64, or PC)
- Run the following on your device
- wget https://raw.githubusercontent.com/avnet-iotconnect/iotc-python-greengrass-sdk/refs/heads/main/installer/ubuntu/device-setup.sh -O device-setup.sh
- bash device-setup.sh ~/my-device-bundle.zip
- STM32MP1/MP2 Devices (OpenSTLinux)
- Requirements
-
The /IOTCONNECT Greengrass SDK requires awsiotsdk → depends on awscli → requires native compilation.
-
Native compilation requires tools not provided in factory images.
-
Therefore, an OpenSTLinux Starter Package upgrade is mandatory.
Steps
-
Flash OpenSTLinux Starter Package
Follow ST’s official instructions:
https://wiki.st.com/stm32mpu/wiki/Category:OpenSTLinux_starter_packages
Tested with version 6.0.0, e.g.:5.0.3-openstlinux-6.6-yocto-scarthgap-mpu-v24.11.06(STM32 MP135F). -
Flashing Options
-
Standard: Use STM32CubeProgrammer (official process, lengthy).
-
Faster Alternative:
-
Use
create_sdcard_from_flashlayout.shfrom the Starter Package scripts to create an SD image. -
Flash the SD card using tools such as
dd(Linux), Rufus, or Balena Etcher.
-
-
-
Once the device specific installer completes, The Greengrass Nucleus Lite should be running, and the device should show up as Connected in /IOTCONNECT within a minute or so.
You can proceed to develop and/or deploy your Greengrass Component.
Component :
A component is a software module that you deploy to a Greengrass core device. It performs functions like running applications, providing runtime environments (e.g., Python), managing data streams, or integrating with AWS services. Component list provides a list of how many components have been deployed into a Greengrass device.
Package :
Package management in Greengrass involves two main components: components and deployments.
To begin, a user can create a component using artifacts and a recipe. Artifacts are the files and dependencies needed for the component, while a recipe describes how these artifacts are used to build the component.
To create a package, the user needs to select a template, which serves as the starting point for the package. This template includes predefined components that can be customized or replaced with custom components created by the user.
Once the components are finalized, they can be published and available for deployment. Deployments allow the user to push the package to the desired devices securely and efficiently.
Deploy :
A deployment in Greengrass means pushing components (apps, ML models, connectors, configs, etc.) to a device running a Greengrass nucleus.
Additional Resources:
Greengrass Lite GitHub Repository: https://github.com/aws-greengrass/aws-greengrass-lite
Setup and Build Documentation: https://github.com/aws-greengrass/aws-greengrass-lite/blob/main/docs