
Rule Management
Overview
- the hardware for physical deployment
- the software for analysis and reasoning and
- the IoT network to connect these parts
While data collection provides insights, the ability to act on that data makes them useful. This is where a rule engine becomes essential. /IOTCONNECT™’s rule engine receives data, performs logic tests based on designated conditions, and performs actions accordingly. Your business can rapidly and effectively scale up by enabling actionable insights from your IoT models.
Why Rule Management
Rule management is essential in scenarios such as managing commercial buildings with IoT solutions. Consider a specific use case involving an IoT system embedded in a commercial building with a temperature sensor. When the temperature reaches ten degree Celsius, the heater is triggered. To achieve this, rules need to be created in the backend process to receive temperature data at specified intervals and determine the appropriate actions.
This module will guide you in creating, editing, and deleting rules, allowing customized and efficient processes.
Create a rule
To create a rule for your IoT network:
- From the left navigation, mouseover the Devices module. Click Greengrass Device. In the middle and toward the down, select Rules.
- Along the top and toward the right, select Create Rule.
You can create two types of rules using /IOTCONNECT™:
- Standard Rule – You define a standard rule using one condition.
- Smart Rule – Define a smart rule by providing multiple conditions that should be matched to trigger the action.
Create a standard rule
- Select Standard Rule from the rule type.
- Enter data in the following fields:
- Rule Name: Enter a unique rule Name to help you identify the rule.
- Template: Select a template to associate with the rule.
- Severity Levels: Select the severity level of a rule based on your business use case.
- Attribute: Select an attribute to associate with the rule.
- Condition: Select a condition for the rule.
- Value: Enter the value upon reaching where a rule should trigger.
- Rule Applies On: Select whether a rule should apply on all the devices of a selected entity, specific devices, or a device group. Note that when you choose all devices of the selected entity, you will also see a checkbox to include the device of child entities.
- Notification Type: Select all (as shown in the image below) or choose a specific notification type for the rule.
- Audience: Specify the roles and users to be notified when the rule matches. Note that you can only select the roles and users you have made. They will come in the drop-down menus of Select Roles and Select Users.
- Click Save to create a standard rule.
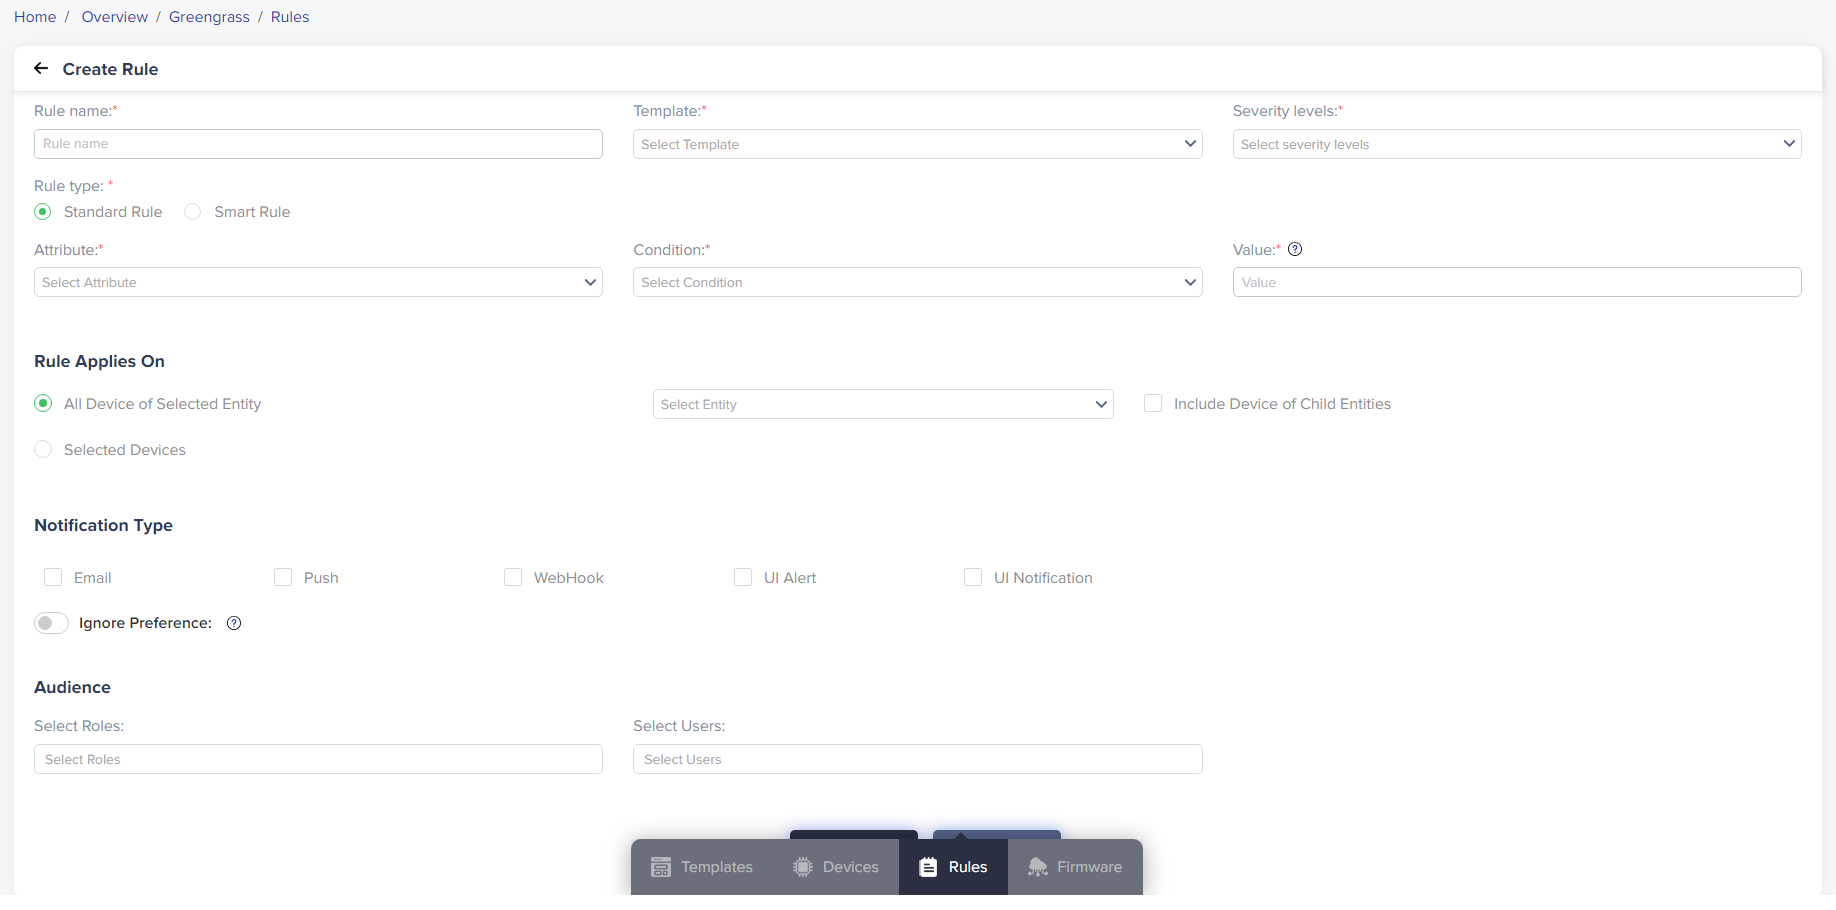
(Screen: Create Rule – Standard Rule)

(Screen: Severity Level)
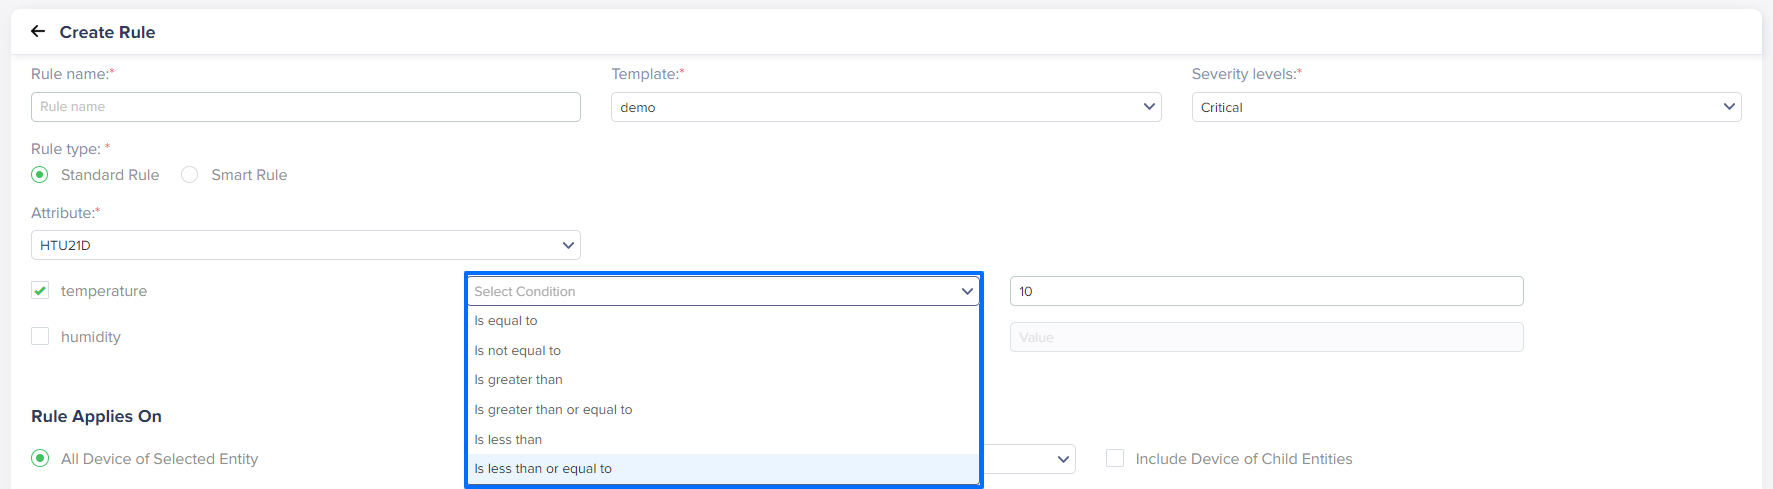
(Screen: Select Condition)

(Screen: Rule Applies On)

(Screen: Notification Type)

(Screen: Audience)
Create a smart rule
- Select Smart Rule from the rule type.
- Click Save to create a smart rule.
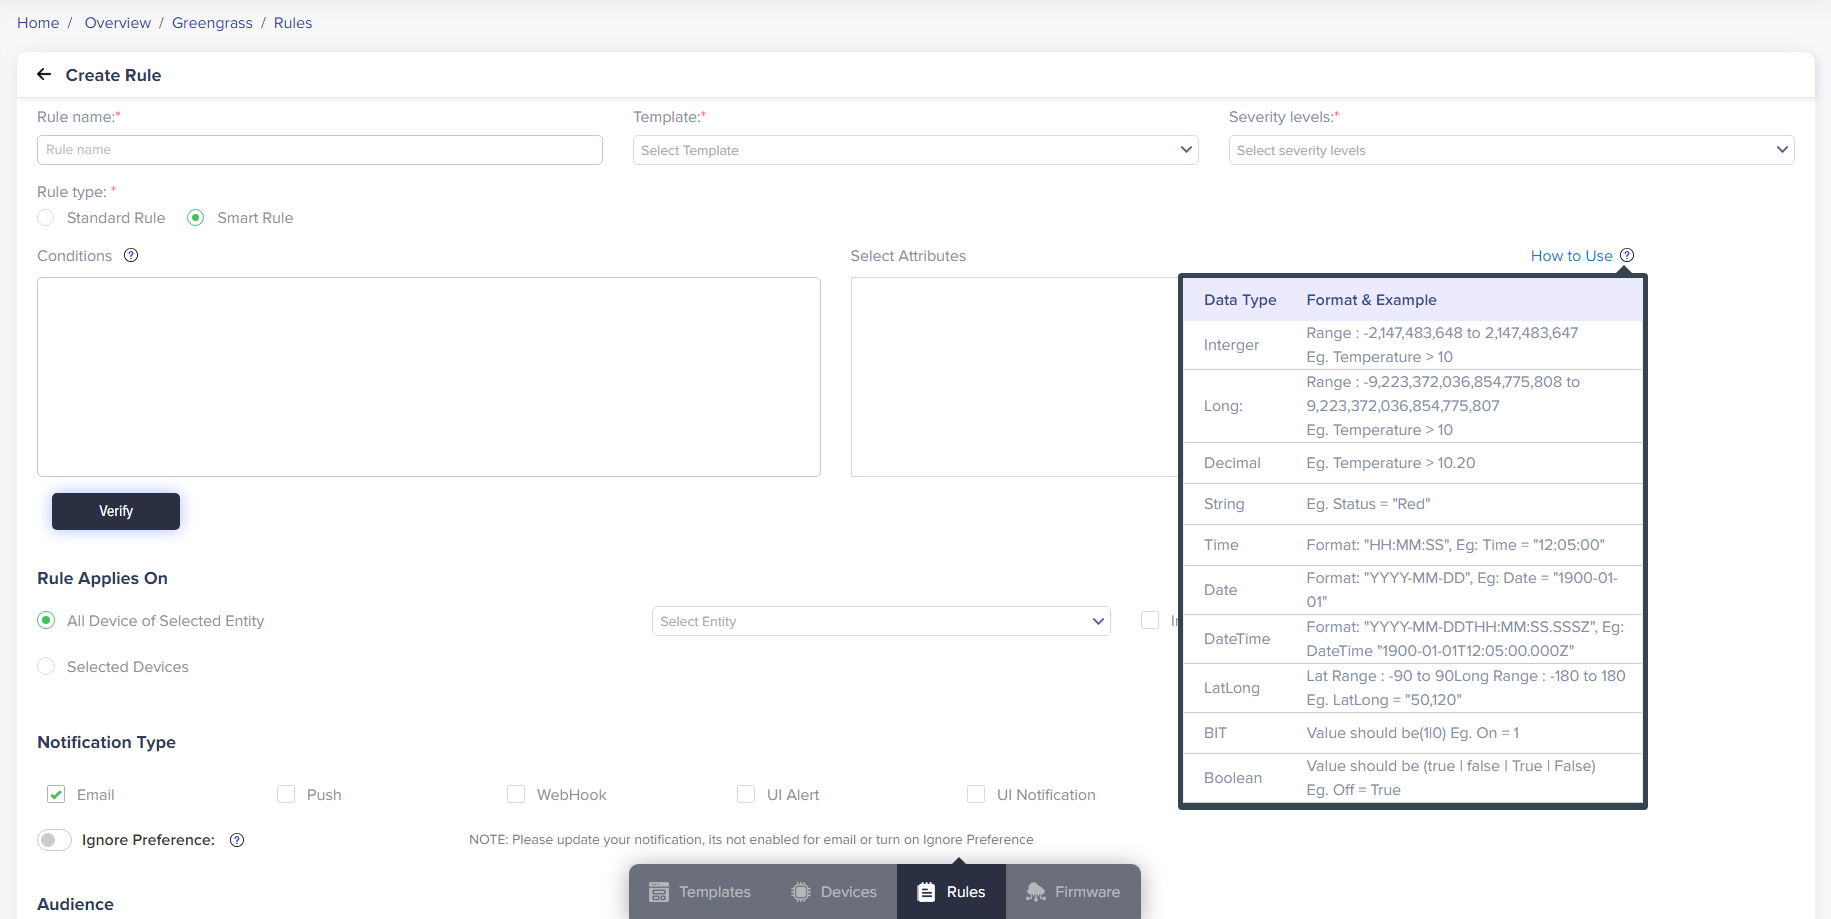
(Screen: Create Rule – Smart Rule)
Complete the required fields as mentioned in creating a smart rule. The only difference here is you can add conditions for multiple attributes.
Rule List
To view the rule list:
- From the left navigation, mouseover the Devices module. Select Greengrass Device. In the middle and toward the down, select Rules.
- The rule list displays a rule name with its condition (rule condition will appear when you mouseover the question mark associated with each rule name), template name, entity name, rule type, user and role numbers, rule status and actions.
- Status: A rule can be Active or Inactive. When you create a rule, its default status is Active. Inactive the rule when you do not need it. Make the rule active whenever you need it back.
- Actions: Apart from editing or deleting a rule, you can track data changes and check the rule’s history.
- Track data change: It shows the data on created date, created by, updated data and updated by.
- Rule History: It displays every rule operation, the user who created or updated the rule and the date when made the latest changes.
- Rule Filter:
- Apply the filter from the top-right corner of the rule list.
- Add filters like rule name, template, entity, rule type and status by selecting the + icon.
- Active status is a default rule filter when you create a rule. You can remove that filter anytime or add more filters.

(Screen: Create Rule – Rule List)

(Screen: Track Data Change)

(Screen: Rule History)

(Screen: Rule Filter)
/IOTCONNECT™ offers five rule filters. Apply any filter and enter the required keywords to retrieve matching results in the rule list. Click Apply Filter to apply it.
Edit a rule
To edit a rule:
- Click on the Rule Name from the rule list. It will show you the fields to edit.
- You can edit everything about a rule. It includes rule name, template, severity levels, attribute, select condition, value, rule applies on, notification type and audience.
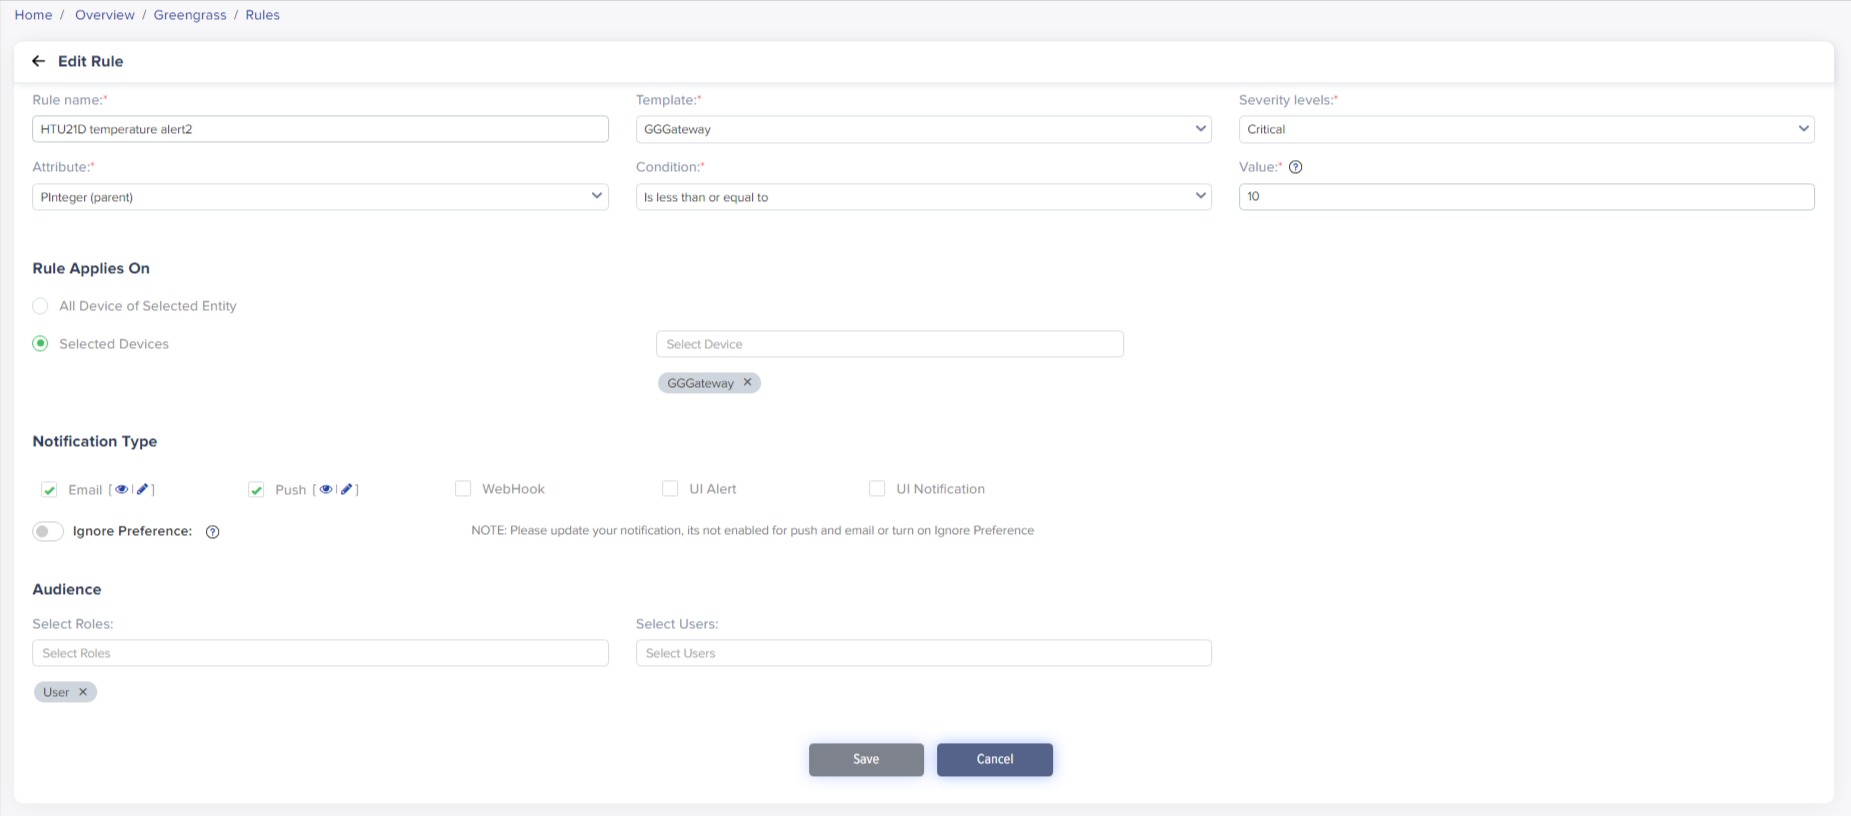
(Screen: Edit Rule)
- Click Save to save changes of rule edits.
Delete a rule
To delete a rule:
- Select the Delete Rule icon from the actions lane.
- It will present the dialogue box titled ‘Delete’.
(Screen: Delete Device)
- Click Ok to delete a rule.