Client libraries and sdk’s
SDK Reference
This document details the specification about /IOTCONNECT™ SDK. The purpose of this document is to define a fundamental approach of SDK.
Most applications have prerequisites. In order to start with SDK development, a developer needs to have clear fundamentals on DeviceCloud and CloudDevice communication. They are also required to a have good knowledge about cloud operations and need access to a few cloud APIs.
SDK Overview
/IOTCONNECT™ SDK (System Development Kit) is highly secure and reliable, which solves the purpose of Device to Cloud and Cloud to Device communications. It is a mediator between the Device and Cloud platform.
Key features for device SDK
- Easy to connect device with cloud by using SDK
- Publish sensor data on cloud (D2C communication)
- Receive command from cloud (C2D communication)
- Get a list of sensors which are predefined in /IOTCONNECT™ platform
Prerequisites
To configure the SDK, the user needs to have completed the steps mentioned below.
Step 1: Registration and onboarding on Partner Program
Step 2: Register a company
- Sign in to the portal
Enter username and password. If you don’t already have one, contact info@iotconnect.io for registration.
- Get the CPID from the /IOTCONNECT™ DevLab.
Note: CPID provided must be hardcoded into the Device’s firmware.
Step 3: Create a new template
- Login to the /IOTCONNECT™ portal
- Go to Menu > Device > Template, to open the Device Template List.
- From the Device Template List, press on the “Add Template” button to create new template.
- Create template with the following details: (See image below)
- Template Code
- Template Name
- Major Firmware
- Description
- Authentication Type
- Edge Support
- Gateway Device
Note: At least one attribute should be added while creating a new template.
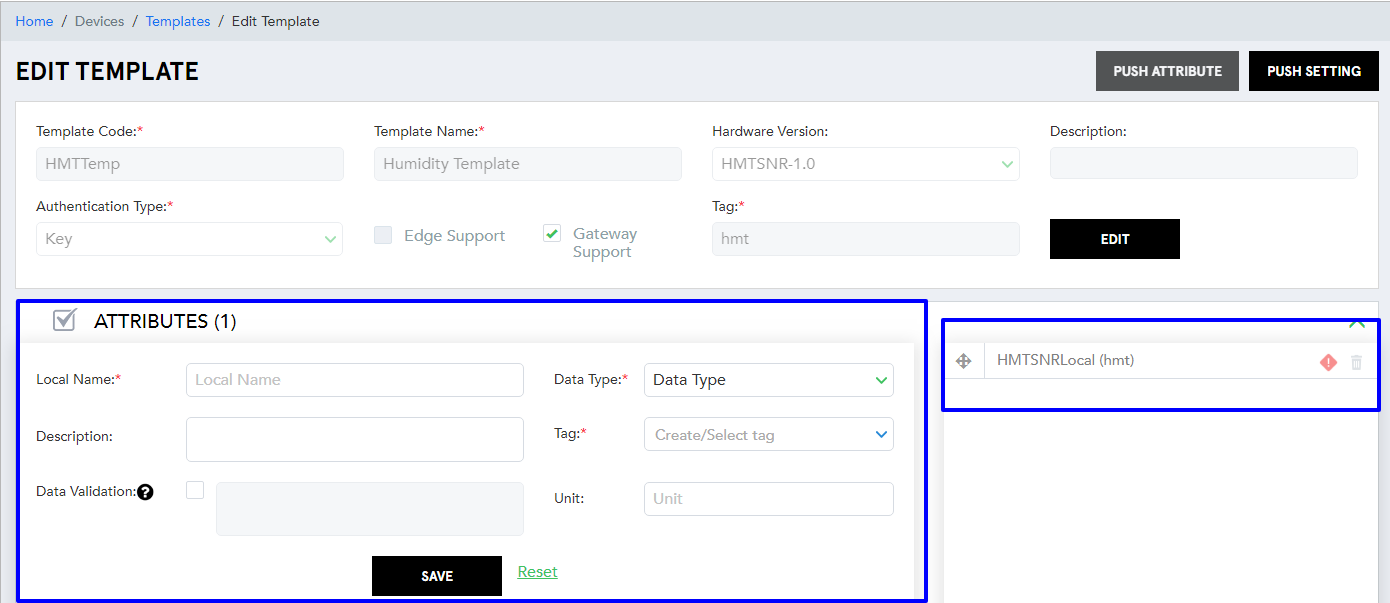
(Screen: Edit Template)
Step 4: Add new device
Two options are available to add a new device.
- Add a New Device from Menu > Device > Devices > Add Device
Add a New Device with the following details:
- Unique ID
- Display Name
- Entity
- Template
- Notes
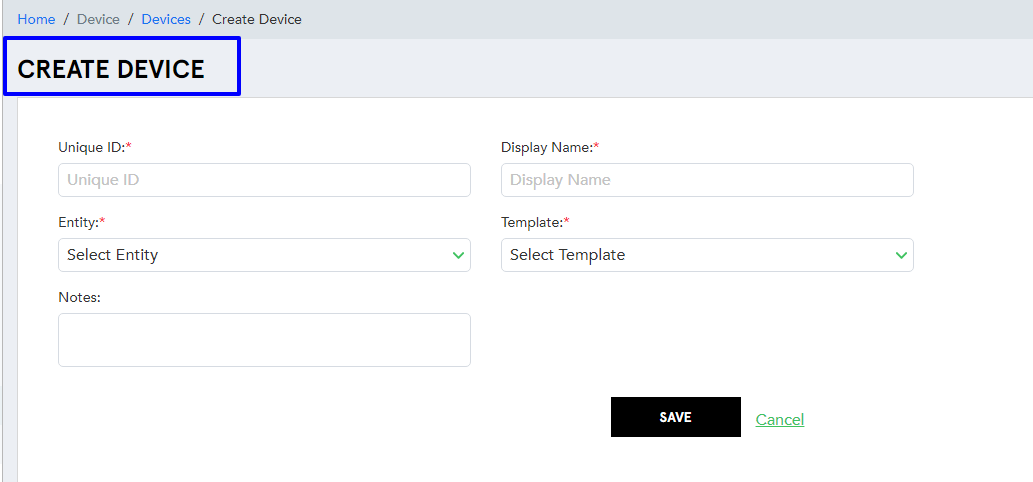
(Screen: Create Device)
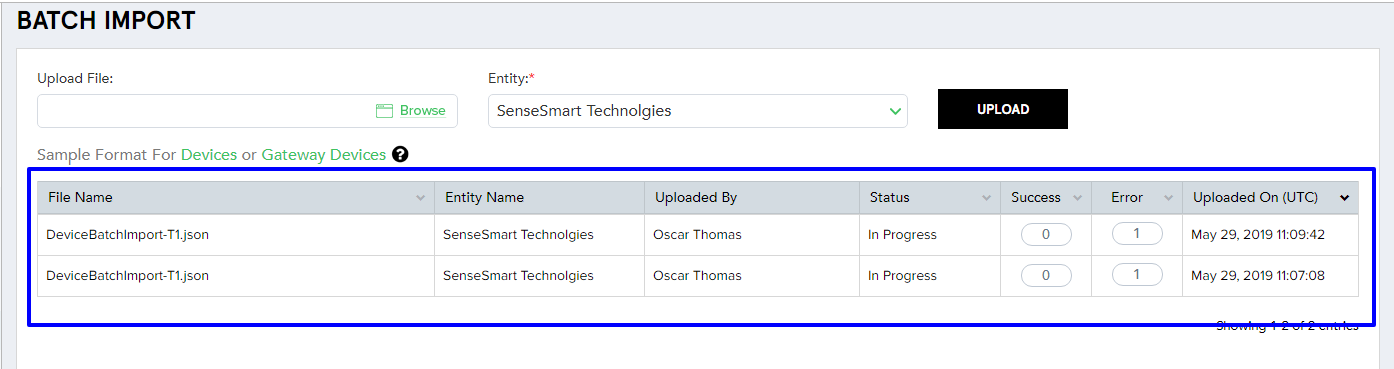
For Gateway Support device only (When you select template with Gateway support)

2. Add a New Device from Menu > Device > Batch Import
Add a New Device with the following details:
- Download sample file and fill expected device information
- Device Entity
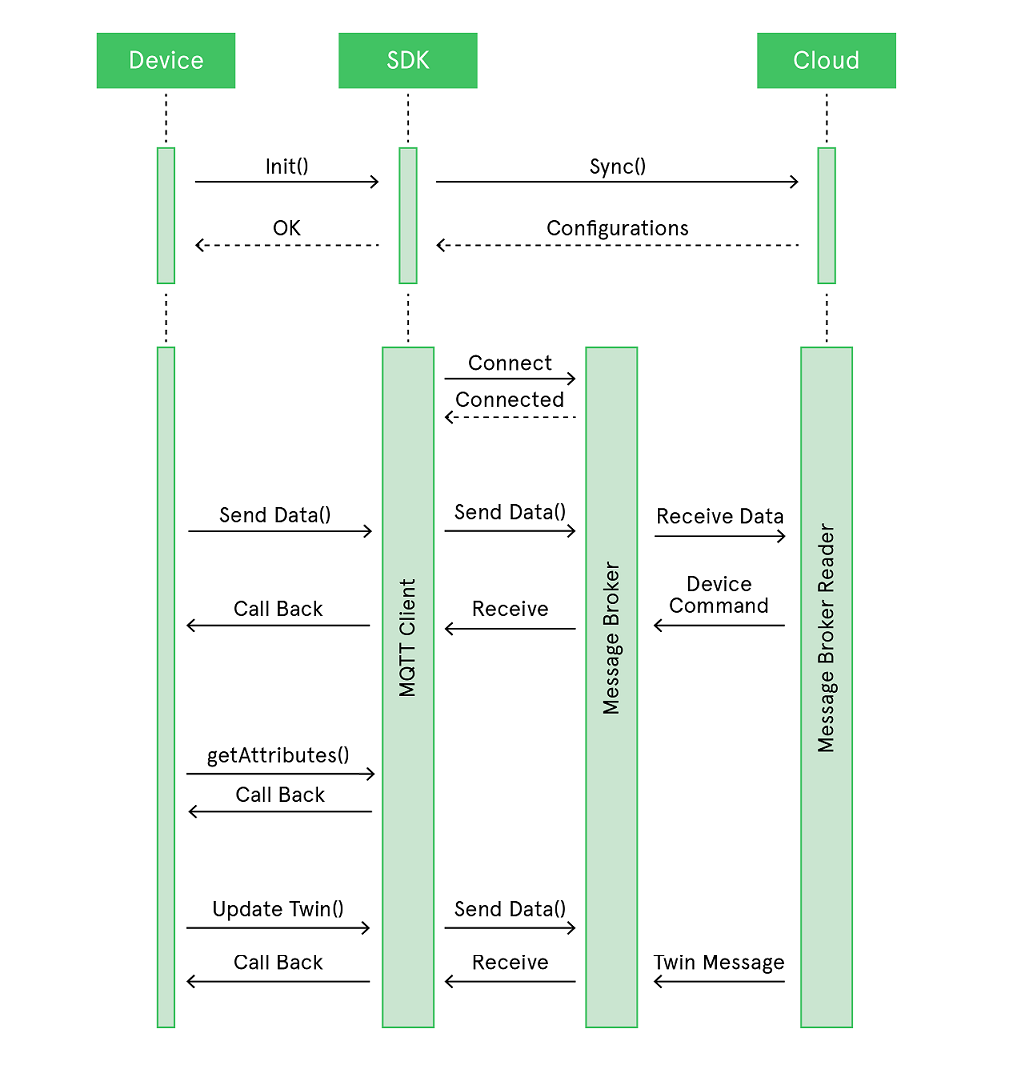
Workflow
As we know SDK is meant to design for Device-Cloud and Cloud-Device communication. This communication happens through different communication channels. Mainly SDK communicates through HTTP(S) and MQTT protocols. This communication includes device initialization, telemetry data transfer and device command execution.
The following diagram is to understand how communication happens through SDK.
SDK Integration
- Initialize / create /IOTCONNECT™SDK object
- Receive data / callback function
- Send data
- Get sensor list
- Update twin property
- Send acknowledgement
1. Initialize / Create /IOTCONNECT™SDK object
New instance of /IOTCONNECT™SDK SYNC API from the cloud using string (cpld, uniqueld, environment and callbackfunction) parameters. “env” is optional, default “env” is production, you can get your “env” from the partner portal. Device sync responses will have all the required information like attributes, settings, sdkConfig, devices & protocols (message broker) connection information, device rule and so on. By using this instance, you can call other methods which are mentioned below.
While initializing the device, we use a variety of authentication methods for device connection as shown below:
- SAS Token
- X.509 self-signed certificate (For Dev Environment)
- X.509 certificate (For Production Environment)
- TPM
Note: The above authentication type must be selected during the template creation stage, based on which the devices are created. When you select the self-signed or CA-signed authentication type, you need to provide the certificate as defined in the SDK code sample respective to the SDK language.
2. Receive data / callback function
To receive data from cloud, we need to implement callback function, which is called automatically and depends on the device connection. It helps you to get the device command from Cloud to Device and perform a predefined action.
3. Send data
Once Init() is executed successfully, the device will be able to start publishing telemetry data using the SDK. Based on Init cached data, the SDK needs to make secure MQTT connection with message broker to send data. Before sending the data, make sure that the particular device is active using the web admin. Send data method uses the predefined data format which is explained in the next point.
4. Get sensor list
After initializing the /IOTCONNECT™ SDK instance, you can get the list of sensors which are predefined in the /IOTCONNECT™ platform. You can send the predefined sensor data in the templates only while other data may be ignored during send data process.
5. Update twin property
Device twins are implicitly created and deleted when a device identity is created or deleted in IoT Hub. This is used along with reported properties to synchronize device configuration or conditions. The solution back end can set desired properties and the device app can read them. The device app can also receive notifications of changes in the desired properties. You can update the reported attribute using this method.
6. Send acknowledgement
This method is used to send the acknowledgement to the cloud. While getting the firmware command you need to send the confirmation message to the cloud that the firmware upgrade resource URL has successfully reached the device.
Preferable Sensor Data Input
[{
  "uniqueId": "123456",
  "time" : '2018-05-24T10:06:17.857Z', //Date format should be in UTC timezone
  "data": {
  "temperature": 15.55,
  "humidity" : 27.97,
  "weight" : 36,
  "gyroscope" : {'x' : -1.2, 'y' : 0.25,'z' : 1.1, }
  }
  }];
Explanation:
uniqueId: It is the device uniqueID
time: Current date and time with UTC timezone
data: Set a JSON data with sensor name and value as per the device generated the data. Make sure you set the all required sensor name in device template as explained in the prerequisite step.
OTA Update And Command
To receive data from the Cloud, we need to implement a callback function, which is called automatically and depends on the device connection. It helps you to get the device command from Cloud to device and perform a predefined action.
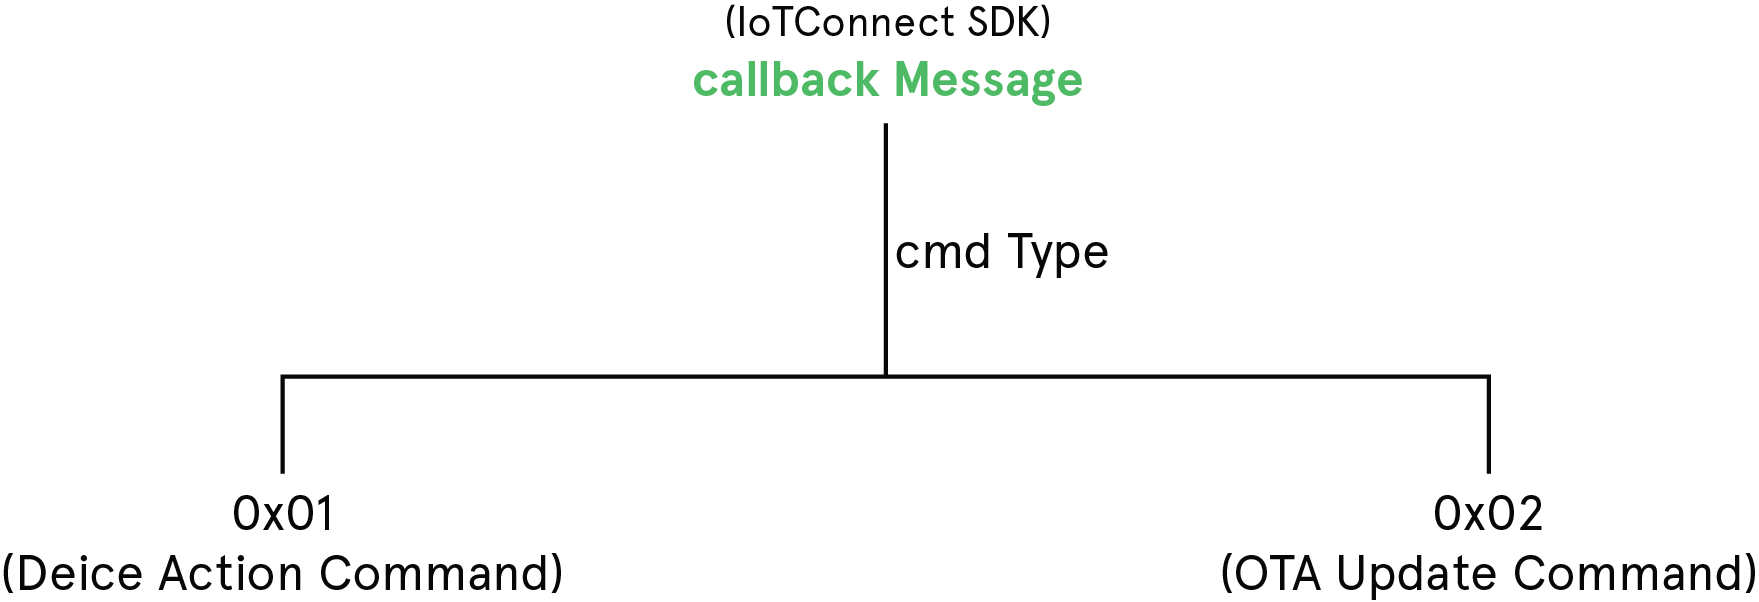
Here, we provide two types of devices to Cloud command. You can receive command from callback function which name is “callbackMessage”. It has placed in the device initialization method. You need to write the firmware in a way that you can receive the command which is sent by the Cloud and take action. Command is received in the form JSON data, in which you get the key name “cmdType” with value in the form of hexa decimal which is as under:
Command Format
{

            "cpid": "<<your cp id>>",
            "cmdType": "0x01", // different command type for manage OTA and Command
            "ack": false,
            "command": "<<your command name>>",
            "uniqueId": "<<your device id>>",
            "ackId": "<<system guid>>",
            "guid": "<<system guid>>"

}
- 0x01 (Device Action Command) :
– It hleps to take action on any sensor.
Example: “command”: “MOTOR-OFF”,
– After command is received, firmware will take care of what to do with the command.
- 0x02 (OTA Update Command) :
– It helps to get the below command:
Example: “ota <<Firmware File URL>>”,
– It helps to download the updated version of SDK and install it.
– At the same time, you need to send the acknowledgement of the received message to the Cloud. For that, you need to publish the message with message type acknowledgement (11). It helps IoT Cloud to get the confirmation of the success of firmware package sent.
– To send acknowledgement you need to follow the below method:
msgType =  11
d2cMsg = {
            "guid" : data['guid'],
            "st" : 3,
            "msg" : ""
}
sdk.SendACK(msgType, d2cMsg)
– After acknowledgement is received, the firmware will take care of this command and decide how to download the file URL.
Code Samples
The Web API can be easily used in C#, Java, Python, or any other development tools supporting communication over the network. /IOTCONNECT™ SDK provides a set of samples in different programming languages showing how to create a simple client application.
- JavaScript (Node.js)
- Java
- Python
- iOS
- Objective-C
- Android
- DOT NET (C#)
JavaScript (Node.Js)
Prerequisite tools:
- NodeJs : Node version v8.9.1 and compatible
- Npm : NPM is compatible to the node version 5.5.1
Installation
- Extract the “iotconnect–sdk-node-v1.0.0.zip“
- To install the required libraries use the below command:
- Go to SDK directory path using terminal/Command prompt
- cd iotconnect-sdk/
- npm install
- Copy the SDK source code(/IOTCONNECT™SDK) into node_modules directory
- cd iotconnect–sdk/node_modules/
- You can take the sample file from the /IOTCONNECT™SDK library and put on project root path.
- Source path : cd iotconnect-sdk/node_modules//IOTCONNECT™SDK/sample
- Destination path : cd iotconnect-sdk/sample
- Using terminal/command prompt, go to the sample folder.
- cd iotconnect-sdk/sample
- Ready to go:
- //This script can send the data to given input(uniqueid, cpid) device by command prompt.
- node example.js <> //Environment DEV, QA, POC, PROD – (Default if not supply the environment argument)
Usage
Declare /IOTCONNECT™ SDK which is placed in node_modules directory.
var sdk = require('/IOTCONNECT™SDK');
Prerequisite input data
var uniqueId = <<uniqueId>>;
    var cpid = <<CPID>>;
    var env = <<env>>; // DEV, QA, POC, AVNETPOC, PROD(Default)
To get the device information and connect to the device
var iotConnectSDK = new sdk(cpid, uniqueId, callbackMessage, twinCallbackMessage, env);
To receive the command from Cloud to Device(C2D)
var callbackMessage = function callbackMessage(data){
            console.log(data);
    }var iotConnectSDK = new sdk(cpid, uniqueId, callbackMessage);
To receive the twin from Cloud to Device(C2D)
var twinCallbackMessage = function twinCallbackMessage(data){
        console.log(data);
    }
To get the list of attributes
iotConnectSDK.getAttributes(function(response){
    console.log("Attributed :: "+ response); });
To send the data from Device To Cloud(D2C)
iotConnectSDK.SendData(sendTeledata);
- To configure the secure SSL/x509 connection follow below step for CA or CA Selfsiged certificate
- Open file : otconnect-sdk//IOTCONNECT™SDK/sample/properties.json
- Set SSL/x509 certificate path for CA sign and Selfsign certificate as shown below
{
            "certificate" : {
                    "SSLKeyPath"    : "<< file path >>/key.pem",
                    "SSLCertPath"   : "<< file path >>/cert.pem",
                    "SSLCaPath"     : "<< file path >>/ca.cert.pem"
            }
    }
To update the Twin Property
var key = "firmware_version";
    var value = "4.0";
    iotConnectSDK.UpdateTwin(key,value, function (response) {
    console.log("Twin update :: ",response);
    })
Sample code
Download sample code from the below list. You need to follow the installation steps mentioned above to run the code.
Java
Prerequisite tools:
- sdk-1.0-jar-with-dependencies.jar
- Java 8 ( or above )
Installation:
- Extract the “iotconnect-sdk-java-v1.0.0.zip”
- Ready to go:
//This script can send the data to given input (uniqueid, cpid) device by command prompt
- java -jar sdk-1.0-jar-with-dependencies.jar
Usage:
Add library
Put sdk-1.0-jar-with-dependencies.jar file in build path
Prerequisite input data *
uniqueId = <<uniqueId>>; cpid = <<CPID>>;
    env = <<env>>; // DEV, QA, POC, PROD(Default)
Create class and implement Interface “SDKCallback”
public class JavaSDKClient implements SDKCallback {
    }
To get the device information and connect to the device
/IOTCONNECT™SDK ioTConnectSDK = new /IOTCONNECT™SDKImpl(cpId, uniqueId ,env, callerClassObject);
Implement method to receive the command from Cloud to Device(C2D)
public void sdkCallbackMethod(CloudResponse cloudResponse) {
            if(cloudResponse!=null) {
                    System.out.println("ACK : " + cloudResponse.getAck());
                    System.out.println("ACK ID : " + cloudResponse.getAckId());
                    System.out.println("Command : " + cloudResponse.getCommand());
                    System.out.println("UniqueId : " + cloudResponse.getUniqueId());
                    System.out.println("Value : " + cloudResponse.getValue());
            }
    }
To send the data from Device To Cloud(D2C)
ioTConnectSDK.SendData(sendTeledata)
Python
Prerequisite tools:
- Python: Python version 2.7, 3.6 and 3.7
- pip: pip is compatible to the python version
- setuptools: Required to install IOTConnect SDK
Installation for Python version 2.7:
- Extract the “iotconnect-sdk-python-v1.0.0.zip”
- To install the required libraries, use the command given below:
- Goto SDK directory path using terminal/Command prompt
- cd iotconnect-sdk/
- pip install iotconnect-sdk-2.0.tar.gz
- Using terminal/command prompt goto sample folder:
- cd iotconnect-sdk/sample
- Ready to go: //This script can send the data to given input(uniqueid, cpid) device by command prompt
- python example_py2.py <> //Environment DEV, QA, POC, AVNETPOC, PROD (Default if not supply the environment argument)
Usage:
Import library
from /IOTCONNECT™SDK import /IOTCONNECT™SDK
Prerequisite input data
uniqueId = <<uniqueId>>
cpid = <<CPID>>
env = <<env>> // DEV, QA, POC, AVNETPOC, PROD(Default)
To get the device information and connect to the device
with /IOTCONNECT™SDK(cpid, uniqueId, callbackMessage, callbackTwinMessage, env) as sdk:
To receive the command from Cloud to Device(C2D)
def callbackMessage(msg):
print(msg)
To receive the twin from Cloud to Device(C2D)
def callbackTwinMessage(msg):
print(msg)
To get the list of attributes
sdk.GetAttributes()
To send the data from Device To Cloud(D2C)
sdk.SendData(sendTeledata)
To update the Twin Property
key = "firmware_version"
value = "4.0"
sdk.UpdateTwin(key, value)
- To configure the secure SSL/x509 connection follow below step for CA or CA Selfsiged certificate
- Open file : sample/properties.json
- Set SSL/x509 certificate path for CA sign and Selfsign certificate as shown below
{
        "certificate" : {
                "SSLKeyPath"    : "<< file path >>/key.pem",
                "SSLCertPath"   : "<< file path >>/cert.pem",
                "SSLCaPath"     : "<< file path >>/ca.cert.pem"
        }
}
To send the Firmware update command acknowledgment.
msgType = 11
d2cMsg = {
"guid" : << GUID >>, // GUID get from the received command
"st" : 3, // STATUS :: Skipped = 2,Success = 3,Failed = 4
"msg" : ""
}
sdk.SendACK(msgType, d2cMsg)
iOS
Prerequisite tools:
- Xcode : Minimum iOS 10.0 Compatible
Installation:
- Get the “/IOTCONNECT™.framework” and add in framework in iOS App Project
Usage:
Import iOS library
#import </IOTCONNECT™//IOTCONNECT™SDK.h>
- Objective-C *
Define SDK object
/IOTCONNECT™SDK *objectIoTSDK;
SDK Init Call
NSString *uniqueId=@"sdk001";
NSString *cpId=@"abcde1";
NSString *strEnv=@"poc”;// DEV  , STAGE  , poc  , QA  , PROD
objectIoTSDK =[[/IOTCONNECT™SDK alloc] init: cpId : uniqueId : strEnv :^(id message) {
    /* Handle Cloud to Device message */
}];
Send sensor data call format
var data=[[
"uniqueId": "sdk001",
"time": "2018-03-08T15:13:13.573Z",
"data": ["temperature": "45”,"humidity": "40"]
]]
Send Temperature and Humidity
object/IOTCONNECT™.sendData(data)NSArray *data=@[@{
                @"uniqueId":@"sdk001",
                @"time":@"2018-03-06T11:38:53.000Z",
                @"data":@{@"temperature":@"45",@"humidity":@"40"
        }
}];
Send Temperature and Humidity
object/IOTCONNECT™.sendData(data)
Objective-C
Prerequisite tools:
- Arduino IDE 1.6.5 or higher
- ESP8266 / ESP32 boards installed
Installation:
- Extract the “ESP32.zip” or “ESP8266.zip” from sdk
- To install the required libraries, use the below command:
- Get help from the documentation file
- Ready to go:
- This script can send the data to given input(uniqueid, cpid, WiFi information)
- Environment DEV, QA, POC, AVNETPOC, PROD – (Default – AVNET if the environment argument is not supplied)
Usage:
Including the libraries (from the zip file)
#include "/IOTCONNECT™.h" // Connection with /IOTCONNECT™ and other process
#include "time.h" // getting real time from NTP server
Define SDK object
IOTConnectClient client;
Prerequisite input data
String ENV = "AVNET";
String VER = "2.0";
char *ssid = "yourNetwork"; // your network SSID (name)
char *pass = "secretPassword"; // your network password )
String cpId = "yourCpid"; // your CPID name can grab it from /IOTCONNECT™ portal
String uniqueID = "yourUniqueID"; // you can grab it from /IOTCONNECT™ portal
To get the device information and connect to the device
client.InitializationSDK(cpId, uniqueID, ENV, VER);
// initialization SDK for /IOTCONNECT™
To receive the command from Cloud to Device(C2D)
void messageReceived(String &topic, String &payload) { // callback function
Serial.println("incoming >> " + payload); // broker on subscribed topic
}
Data input format
DynamicJsonBuffer jsonBufferIN;
JsonArray& Device_data= jsonBufferIN.createArray();
JsonObject& Device_01= Device_data.createNestedObject();
Device_01["uniqueId"] = uniqueID;
Device_01["time"] = GetTime();
JsonObject& D01_Sensors=Device_01.createNestedObject("data");
D01_Sensors["humidity"] = random(20, 80);
D01_Sensors["Temperature"] = random(12, 32);
JsonObject& D01_SensorsX= D01_Sensors.createNestedObject("Vibration");
D01_SensorsX["x"] = random(12, 50);
D01_SensorsX["y"] = random(-20, 30);
D01_SensorsX["z"] = random(10, 35);
Device_data.printTo(DataBuffer, sizeof(DataBuffer));
To send the data from Device To Cloud(D2C)
client.SendDataINput(DataBuffer);
To update the Twin Property
String key = "firmware_version";
String value = "4.0";
client.UpdateTwin(key,value);
Sample code
Download sample code from the below list. You need to follow the installation steps mentioned above to run the code.
Android
Prerequisite tools:
- Java 8 (or above)
- Android SDK
- Android Studio
Installation:
1. Please verify jcenter in your root build.gradle at the end of repositories:
allprojects {         repositories {
                ...                         jcenter()
        }
}
2. Add the dependency
dependencies {
                implementation 'com.iotconnectsdk:iotconnectpoc:2.0.0'

}
Usage:
Add library
Prerequisite input data
uniqueId = <<uniqueId>>; cpid = <<CPID>>; env = <<env>>;
// DEV, QA, POC, AVNETPOC, PROD(Default)
Create class and implement Interface “IotSDKCallback”
public class JavaSDKClient implements IotSDKCallback {
}
To get the device information and connect to the device
/IOTCONNECT™SDK ioTConnectSDK = new /IOTCONNECT™SDK(context,cpid,uniqueId, callerClassObject,env);
Implement methods to receive the command from Cloud to Device(C2D)
public void onReceiveMsg( HubToSdkDataBean cloudResponse) {         if(cloudResponse!=null) {
                System.out.println("ACK : " + cloudResponse.getAck());
                System.out.println("ACK ID : " + cloudResponse.getAckid());
                System.out.println("Command : " + cloudResponse.getCommand());
                System.out.println("UniqueId : " + cloudResponse.getUniqueid());
                System.out.println("Value : " + cloudResponse.getValue());
        }
}
Get attributesList
public void attributeData(final List<SyncServiceResponse.DBeanXX.AttBean>
attributesBeanList) { }
Get connection status
public void onConnectionStateChange(boolean isConnected) {
}
To send the data from Device To Cloud(D2C)
ioTConnectSDK.SendData(sendTeledata)
Disconnect iotConnect on Activtiy onDestroy
@Override
    protected void onDestroy() {         super.onDestroy();         if(iotConnect!=null)
        {
            ioTConnectSDK.disconnectSDK();
        }
    }
Sample code
Download sample code from the below list. You need to follow the installation steps mentioned above to run the code.
DOT NET (C#)
Prerequisite tools:
- NET Core 2.0
Installation:
- Open Visual Studio 2017, Create new .net core Console App
- Create new folder called Nuget and place IOTConnect SDK Nuget package
- Open Nuget Package Manager of Console App and click on Setttings for Package source
- Add new Package source, name it as LocalPackage and in source give path of Nuget folder created in step #2
Usage:
In Program.cs add namespace of IOTConnect SDK
using IOTConnectSDK;
Create object of SDKClient
string cpId = "", uniqueId = "";
SDKClient client = new SDKClient(cpId, uniqueId, FirmwareDelegate, TwinUpdateCallBack);
Callback function to receive Cloud to Device message (C2D)
public static Task FirmwareDelegate(string message)
{
    Console.WriteLine("Command Received.");
    Console.WriteLine(message);
    return Task.CompletedTask;
}
Callback function to receive twin update
public static Task TwinUpdateCallBack(Dictionary<string, object> twins)
{
    Console.WriteLine("Twin Update received.");
    foreach (var twin in twins)
    {
        Console.WriteLine($"{twin.Key}:{twin.Value}");
    }
    return Task.CompletedTask;
}
Sample data
[{
                "cpId": "",     //CPID of company
                "time": "",     //Datetime Fromat: YYYY-MM-DDTHH:MM:SS.SSSSSSSS"
                "uniqueId": "", //Device ID
                "d": [{         //Telemetry data
                                "voltage": 143.0,
                                "current": 4.0,
                                "frequency": 6.10,
                                "brewing": false,
                                "product": null,
                                "size": null,
                                "device": "off"
                        }
                ]
        }
]
To send the data from Device To Cloud(D2C)
client.SendData(File.ReadAllText(@"devicedata.json"));
To configure the secure SSL/x509 connection follow below step for CA or CA Selfsiged certificate
- Open file : iotconnect-sdk//IOTCONNECT™SDK/sample/properties.json
- Set SSL/x509 certificate path for CA sign and Selfsign certificate as shown below
SDKClient.SSL.Certificate = certiPath;
SDKClient.SSL.Password = certiPass;
To update the Twin Property
client.UpdateTwin("twin-property","new value");
Sample code
Download sample code from the below list. You need to follow the installation steps mentioned above to run the code.
Device Command
To receive data from the cloud, we need to implement a callback function, which is called automatically and depends on the device connection. It helps you to get the device command from Cloud to Device and perform a predefined action.
Here, we provide two types of devices to cloud command. You can receive command from callback function which name is “callbackMessage”. It is placed in the device initialization method. You need to write the firmware in a way that you can receive the command which was sent by the cloud and take further action. Command will be received in the form JSON data, in which you get the key name “cmdType” with a value in the form of hexadecimal, which is as under:
Command format:
{
"cpid": "<<your cp id>>",
"cmdType": "0x01", // different command type for manage OTA and Command
"ack": false,
"command": "<<your command name>>",
"uniqueId": "<<your device id>>",
"ackId": "<<system guid>>",
"guid": "<<system guid>>"
}
- 0x01 (Device Action Command):
- It helps to take action on any sensor.
- After command received, firmware will take care next what to do with this command and make operation on device.
Example : “command”: “MOTOR-OFF”
2. 0x02 (OTA Update Command):
- It helps you to get the command given below.
- It helps you to download the updated version of the SDK and install it.
Example : “ota <<Firmware File URL>>”,
- At the same time, you need to send the acknowledgment of the received message to the cloud. For that, you need to publish the message with message type acknowledgment (11). It helps the IoT cloud to get the confirmation that the firmware package was sent successfully.
To send acknowledgment you need to follow the below method.
msgType = 11
d2cMsg = {
"guid" : << GUID >>, // GUID get from the received command
"st" : 3, // STATUS :: Skipped = 2,Success = 3,Failed = 4
"msg" : ""
}
sdk.SendACK(msgType, d2cMsg)
After acknowledgment is sent, the firmware will take care of this command and decide how to download the firmware file and configure it.
3. 0x10 (Template Attribute Update):
It helps, you can get alert from the cloud. It defines, Template Attribute information has been updated. It is used for SDK to update the device information.
4. 0x11 (Setting Information Update):
It helps you to get alerts from the cloud. It defines, Setting Information has been updated. It is used for SDK to update the device information.
5. 0x12 (Device Password Update):
It confirms that the Device Password Information has been updated. It is used by the SDK to update the device connection information and instantly reconnect the device.
6. 0x13 (Device Information Update):
It confirms that the Device Information has been updated. It is used by the SDK to update the device information.
7. 0x15 (Rule Update):
It helps, you can get alert from the cloud. It defines, Rule Information has been updated. It is used for SDK to update the rule information without loose the connection.